Exterior Door Installation Guide: Step-by-Step Instructions for a Secure, Professional Fit
Exterior Door Installation Guide: Step-by-Step Instructions for a Secure, Professional Fit
Installing a new exterior door boosts security, saves energy, and gives your home’s look a fresh upgrade. When we approach exterior door installation with careful measurements, solid prep, and the right tools, we set ourselves up for a smooth install that’ll actually last.
We install an exterior door by measuring the rough opening, setting a prehung unit level and plumb, securing it, and sealing it to block air and water leaks. If we take our time with each step, we avoid drafts, sticky doors, and expensive fixes later.
This guide walks us through picking the right door, prepping the opening, removing the old one, and sealing everything up for a tight, long-lasting fit. With a plan, we can get the job done efficiently and boost energy efficiency at the same time.
Key Takeaways
- Accurate measurements and good prep mean a secure, level fit.
- Proper installation and fastening stop drafts, leaks, and shifting.
- Good insulation and sealing help with energy efficiency and durability.
Choosing the Right Exterior Door
We need to match the door’s type, material, and construction to our opening and climate. The right choice means better security, energy savings, and durability, plus it just makes installation easier.
Comparing Prehung and Slab Doors
First, we pick between a prehung exterior door and a slab door . A prehung door comes as a package: the door slab, hinges, and frame all assembled. Installing it as a unit really helps if the old frame is damaged or crooked.
A slab door is just the panel, no frame. We go this route only if the current frame is in great shape and lined up right. It takes more skill, since we have to cut hinge mortises and prep the lockset ourselves.
Key differences:
- Prehung exterior door Easier to align, faster to install
- Best for new builds or full-frame swaps
- Costs more upfront, but usually fewer headaches
- Slab door Cheaper materials
- Uses existing frame
- Needs precise measuring and some carpentry chops
If the opening’s off, we usually pick prehung. If the frame’s still square and solid, a slab can work.
Material Options: Fiberglass, Wood, and More
Material really matters for durability, upkeep, insulation, and style. We choose based on weather, budget, and design taste.
Fiberglass doors shrug off dents, rot, and moisture. They handle big temperature swings and often have insulated cores for better energy performance. Many even mimic wood grain, without all the maintenance.
Wood doors look and feel classic. They’re great for traditional homes, but they need regular sealing to avoid warping or water damage. In tough climates, we add an overhang to help them last.
Other options:
- Steel doors: Tough and secure, usually foam-insulated, but they can dent and need repainting.
- Aluminum or composite: Light and rust-proof, often found in modern styles.
We weigh looks against performance. In humid or cold places, fiberglass or insulated steel often beats solid wood for stability.
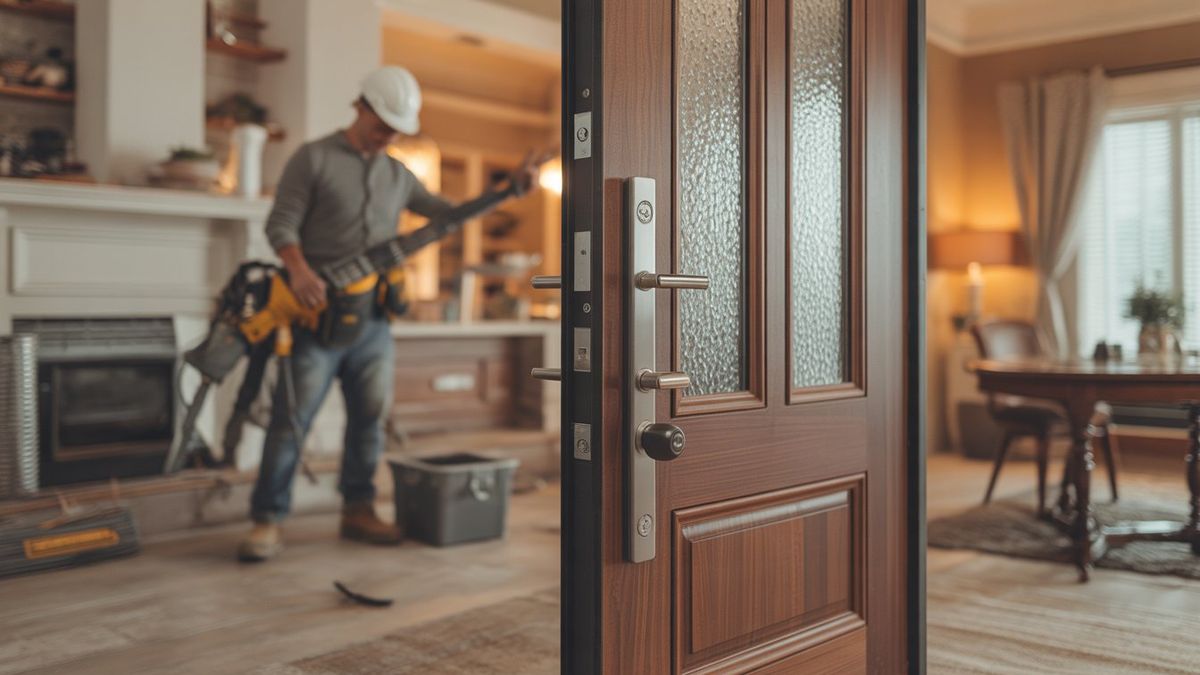
Understanding Door Components
An exterior door system is more than just the slab. We check each part to make sure it fits and keeps things secure.
Main components:
- Door slab: The main panel, could be solid or insulated.
- Frame and jambs: Hold the door and anchor it to the house.
- Threshold: Seals the bottom, sheds water.
- Weatherstripping: Blocks drafts and moisture.
- Hinges and lock prep: Key for durability and security.
We look for adjustable thresholds and reinforced strike plates, too. Those details help with energy savings and security.
When we pick a door system built to work together, installation’s a lot more predictable. A good match cuts down on callbacks and keeps the door working longer.
Measuring and Preparing the Rough Opening
Getting the measurements right and making sure the rough opening is solid keeps us from running into alignment problems or air leaks. We focus on sizing, checking the structure, and leveling the base before we set the new frame.
How to Measure for a New Door
We always measure the rough opening , not the old slab. If needed, we pull off the interior casing so we can see the framing.
Measure the width between the inside edges of the king studs, top, middle, and bottom. Go with the smallest number.
Then, measure the height from the subfloor to the bottom of the header on both sides. Again, use the smaller one.
For most prehung exterior doors, the rough opening should be 2 inches wider and about 2 to 2-1/2 inches taller than the door itself. For example:
We also measure wall thickness to match the jamb depth. Most framed walls are 4-9/16" thick, but it’s worth double-checking.
Finally, we check if the opening is square by measuring diagonally from corner to corner. If there’s a big difference, we’ll need to plan for shimming.
Inspecting and Repairing the Opening
We check the framing for rot, water damage, or loose fasteners. The sill area is a common trouble spot, so we poke around with a screwdriver to make sure it’s solid.
If we find bad wood, we swap it out before moving on. Installing over damaged framing just leads to problems down the road.
We check that the opening is:
- Plumb on both king studs
- Level across the header
- Flat and solid at the subfloor
A 4-foot level helps us check vertical and horizontal alignment. If the studs lean, we fix it with shims or a planer.
We also make sure the opening matches the manufacturer’s size requirements. Too tight, and installation’s a pain; too loose, and we lose structural support.
Preparing the Threshold and Door Frame
We make sure the subfloor under the threshold is clean, dry, and level. Even a small slope can mess up the seal.
If the floor’s uneven, we fix it with shims or leveling compound. The threshold needs to sit flat along its entire length.
Before installing, we dry-fit the door in the rough opening. This checks for clearance and lets us see if we need to tweak anything.
Then, we run flashing tape along the sill and up the sides to direct water out. In wet climates, a sill pan adds extra protection.
Once we’ve prepped everything, the opening should be square, level, and solid, a good base for the new door frame.
Removing the Old Door and Frame
We remove the old door and frame carefully. If we rush, we risk damaging the rough opening, which just means more work later.
Safely Detaching the Existing Door
We open the door all the way and support it with shims or a helper. That takes the weight off the hinges.
Using a drill or screwdriver, we take out the hinge screws from the jamb. If they’re stuck, we cut paint lines with a utility knife before prying. Once the hinges are free, we lift the slab off and set it aside.
Next, we pry off the interior and exterior trim. A putty knife behind the trim helps avoid wall damage. After the casing’s off, we find and pull the screws or nails holding the frame to the opening.
For older doors, a reciprocating saw helps cut through long nails. We go slow to avoid hitting the framing.
Clearing Debris and Old Hardware
With the frame out, we inspect the rough opening for any issues. We check the sill plate, king studs, and header for rot, cracks, or movement.
We scrape away old caulk, foam, and shims. A stiff putty knife and pry bar handle most of it. We also pull any leftover nails or screws.
If there’s minor rot, we replace the bad wood. Bigger problems mean we stop and fix it before setting the new frame.
Before moving on, we vacuum debris and check that the opening is clean and level . A clear, solid opening makes the new frame go in straight and seal right.
Step-by-Step Exterior Door Installation
We focus on getting the position right, supporting the frame, and fastening it securely for a weather-tight fit. Leveling, shimming, and threshold placement matter a lot, otherwise, we end up with drafts or a sticky door.
Dry Fitting and Positioning the New Door
We start by dry fitting the prehung exterior door in the opening. No sealant or screws yet. This helps us check that the opening is square, plumb, and roomy enough for adjustments.
We set the door in and check the gaps at the top and sides. They should be even, about 1/8 to 1/4 inch all around. If the door binds or gaps are weird, we fix the framing before moving on.
We use a level to check the hinge jamb for plumb and make sure the head jamb is level. These checks decide how well the door swings and seals.
Dry fitting keeps us from forcing the unit in place. It helps avoid twisting the frame and makes sure the panel lines up right.
Leveling and Securing with Shims
Once it fits, we slide shims between the frame and the rough opening. We start behind the hinges, since that side carries all the weight.
We adjust shims until the hinge jamb is perfectly plumb. A vertical level tells us when it’s right. Even small tweaks make a difference.
After the hinge side’s set, we shim behind the latch side and the head jamb. We keep reveal lines even and make sure the door opens and closes smoothly.
Pairs of shims from opposite sides help make a tight, adjustable fit. We only trim off the extra once the frame’s fastened.
Good shimming keeps the frame square and stops sagging. That’s what keeps the door working well for years.
Installing the Threshold
We prep the subfloor before setting the threshold. It’s got to be clean, level, and solid.
If needed, we run a bead of exterior sealant along the subfloor where the threshold will go. That helps block water and air.
Most prehung doors come with the threshold attached. We lower the whole unit into the bed of sealant to make a tight seal.
We check the threshold with a level side to side. If it’s not flat, the door might swing open or closed by itself, or leave gaps at the weatherstripping.
If the floor slopes, we use shims under the threshold to fix it. Once it’s level, we secure it with screws, following the manufacturer’s instructions.
Fastening the Door Frame
After shimming and leveling, we fasten the frame. We start on the hinge side to keep everything lined up.
We drive corrosion-resistant screws through the jamb and shims into the studs. Swapping one hinge screw for a longer one that bites deep into the stud adds strength.
Next, we secure the latch side and head jamb. We check the door’s swing and latch before tightening everything down. The door should move freely and latch without sticking.
We don’t over-tighten, too much pressure can bow the frame. A warped jamb ruins the seal and the door’s function.
Careful fastening keeps the door stable. A solid frame means better security, energy savings, and less hassle later.
Insulating, Sealing, and Finishing Touches
We seal gaps, insulate the frame, and install trim and hardware to help with energy efficiency and durability. Good sealing blocks drafts, keeps moisture out, and protects the rough opening .
Applying Low-Expansion Foam Insulation
We fill the gap between the frame and the rough opening with low-expansion foam insulation . This foam expands slowly, so it won’t bow the frame or mess up how the door closes.
Shake the can and stick the tube deep in the gap. We apply foam in thin layers, filling about half the cavity to leave room for expansion.
We avoid overfilling. Too much foam can push the jamb out of line and mess up the reveals.
After the foam cures, we trim off any extra with a utility knife. We check that the frame is still plumb and square before moving on.
If there’s a big gap, local code might require fiberglass insulation first, then foam on top for a tight seal.
Installing Weatherstripping and Caulking
We install weatherstripping around the door frame. This creates a tight seal when the door closes.
Compression weatherstripping along the head and jambs should press firmly against the door. You shouldn't have to force the latch.
Check for uniform contact along all sides. Replace worn or uneven strips to prevent drafts and water from sneaking in.
At the bottom, install or adjust a door sweep so it just touches the threshold. This blocks air and insects but doesn't make the door hard to open.
On the exterior, run a continuous bead of high-quality exterior caulk where the trim meets the siding. Seal every joint and corner you can find.
Tool the caulk so it makes full contact and looks neat. A good seal here really helps with energy efficiency and keeps moisture out.
Reattaching Trim and Installing Hardware
We reinstall interior and exterior trim after finishing insulation and sealing. Nail the trim into the framing, not just the door frame, to keep everything solid.
Test the door before locking things down. Open and close it a few times to check for even gaps and a proper latch.
Install the lockset, deadbolt, and strike plates using the manufacturer’s measurements. Make sure the strike plate lines up so the latch works smoothly.
Tighten all screws firmly, especially the long ones that anchor hinges and strike plates into the wall framing. This keeps the door secure and helps prevent sagging later.
Finish up by touching up nail holes, paint, or stain as needed. That protects exposed wood and gives the installation a finished look.
Frequently Asked Questions
Installing an exterior door takes accurate measurements, proper framing, careful shimming, and correct sealing. We focus on each step, structural integrity, and weather protection for a secure, energy‑efficient fit .
How do you install a prehung exterior door step by step?
We start by removing the old door and frame. Then we inspect the rough opening for rot, damage, or framing that's out of square.
We confirm the rough opening size and clear out debris. Flashing tape goes on the sill and side jamb areas.
Next, we dry-fit the prehung unit to check clearances. We put exterior-grade sealant on the subfloor and behind the brickmold or mounting flange.
We set the door in the opening and shim behind the hinges first. Then we fasten the hinge-side jamb, keeping it plumb.
Shims go on the latch side and head jamb to create an even reveal around the door. Once the gaps look good, we secure the frame with screws.
We insulate gaps with low-expansion foam . Interior trim goes in next, and we seal all exterior joints to keep air and water out.
What measurements are needed before buying a replacement exterior door?
First, measure the width and height of the existing door slab. Then measure the rough opening width and height between framing members.
Check the jamb depth to match your wall thickness, including drywall or any interior finish. That way, the new frame sits flush with the interior walls.
Look at door swing direction, hinge placement, and threshold height. Getting these details right saves you from headaches and extra work later.
Can you install a new exterior door using the existing frame, and when should the frame be replaced?
We can reuse the existing frame if it’s square, solid, and free of rot or warping. The jamb has to match the new door slab size and hinge layout.
We replace the frame if we find water damage, soft wood, or joints that are coming apart. If the frame is out of square or you want better weather sealing, it’s usually best to upgrade to a prehung unit.
A full frame replacement often means better energy efficiency and durability down the road.
What are the most common exterior door installation mistakes and how can they be avoided?
A common mistake is skipping the check for a level and plumb rough opening. We always use a level on the sill and both sides before setting the door.
Improper shimming causes uneven gaps or sticking. We put shims at hinge points and latch locations to keep everything lined up.
Skipping flashing or sealant lets water in where you don’t want it. We install sill pans or flashing tape and seal all exterior edges carefully.
Overfilling gaps with high-expansion foam bows the frame. We only use low-expansion foam made for windows and doors.
How do you properly shim, level, and plumb an exterior door for a tight, even reveal?
We start at the hinge side and insert shims behind each hinge spot. Then we check for plumb with a level before driving screws through the jamb and shims into the framing.
Next, we adjust the latch side shims to get an even gap between the door slab and frame. The reveal should look consistent from top to bottom.
We check the head jamb for level and tweak shims if needed. After tightening screws, we swing the door to make sure it opens smoothly and the spacing stays even.
How do you install an exterior door when there is no existing doorway or rough opening?
First off, check if the wall is load-bearing. If it is, you’ll need to add structural support, don’t skip that step.
Always follow local building codes, and get permits if the city says so.
Next, mark out the new opening using the door unit’s rough opening specs. Cut through the drywall and sheathing, then frame it up with king studs, jack studs, and a header that fits.
Once the framing’s in place, put in a sill plate and add flashing to keep moisture out.
Set the prehung door in the opening. Shim it, fasten it, and insulate around the frame. Finally, seal everything up like you would for any standard exterior door install.